30 Eylül 2012 Pazar

A Midsummer Day's Dream . . . Cream Cheese Nectarine Cake with Crumbly Streusel

To contact us Click HERE

Nectarines . . . really fine, really sweet nectarines. Not something one can necessarily count on finding here in Michigan. Usually, though, that doesn't matter. Why? Because typically, in mid-July, we're wallowing in a surplus of glorious local cherries, baking them into this and stirring them into that, not giving those pretty nectarines from out of state a second thought. But late winter weather played holy havoc with Michigan's cherry orchards this year, leaving us with the most pathetic harvest in decades. Trees that would normally be bending under the weight of crimson fruit look instead as if they've been ever so lightly dotted with red.  Just a cherry here, a cherry there. Sorry, folks--forget about "pickin' your own" and keep your fingers crossed for next year.


No home-grown cherries? For born and bred Michiganders that scenario is virtually unheard of. So, nothing left to do but rev up the contingency plans. Time to focus on nectarines instead, nectarines that hail inevitably from elsewhere. A sobering thought, no doubt. Miraculously, though, they're incredibly sweet and more than up to snuff. I've been shocked by their quality, thus I've been munching them the last few days with an unbridled sense of righteous privilege, like a koala in a eucalyptus tree. Don't try to stop me.


About this recipe . . . 


I adapted this from The Grand Central Baking Book, by Piper Davis and Ellen Jackson (I love this book, by the way, and recommend it). I started with their recipe for a cream cheese apple cake, but made some significant tweaks.

First, I reduced the overall size of the recipe by about one third, from one that would produce a large 12" bundt cake down to a reasonably sized 9" round cake made in springform pan. I used a relatively small amount of chopped ripe nectarines, unpeeled, in the batter versus a sizable portion of peeled apples. I added in a modest amount of almond flour/meal (if you can't find it in your usual grocery store, check at Trader Joe's, Whole Foods, or health food stores), which lends a subtle richness to the texture without adding any overt almond flavor. I upped the amount of vanilla, in fact using vanilla bean paste instead of extract, and I also fiddled with the proportion of cinnamon. 


The addition of a streusel topping worked out well, too; I just threw together flour, sugar, almond flour/meal, cold butter, and a pinch of fine sea salt and went at it with a pastry blender. You can count on a cake that happily straddles the fence between a coffee cake and a not-too-dense pound cake. A great cake overall, even without our beloved Michigan cherries.


Cream Cheese Nectarine Cake with Crumbly Streusel


(For a printable version of this recipe, click here!)

Yield: About 16 slices

For the cake:
2 and 1/2 cups unbleached all-purpose flour
1/2 cup almond flour/meal
1 teaspoon baking powder
2/3 teaspoon coarse kosher salt
1/2 teaspoon ground cinnamon
2/3 cup unsalted butter, softened (that's one stick and about 2.5 tablespoons)
8 oz. cream cheese
2 cups granulated sugar
3 large eggs, room temperature
1 and 1/2 teaspoons vanilla bean paste (or vanilla extract)
1 extra-large ripe nectarine, unpeeled, pitted, and chopped into very small pieces

For the streusel:
1/3 cup granulated sugar
1/2 cup almond meal/flour
1/4 cup unbleached all-purpose flour
5 tablespoons of cold, unsalted butter, cut into small chunks
1 pinch fine-grain sea salt

Preheat your oven to 350 degrees. Grease and flour a 9" springform pan.

Make the streusel first:

In a medium bowl, whisk together the sugar, almond meal/flour, and all purpose flour. Toss in the butter chunks and combine with a pastry blender or a fork until most of the mixture is in pieces approximately the size of a large pea. Cover the bowl and put it in the fridge.

To make the cake batter:

In a medium bowl, lightly whisk together the flour, almond flour/meal, baking powder, salt, and cinnamon. Set aside.

In the large bowl of your mixer, using the paddle attachment on medium-high speed, beat together the butter, cream cheese, and sugar until the mixture is fluffy and light in color (beat for at least five minutes and as long as eight). On low speed, add in all of the vanilla, and add the eggs one at a time, beating well after each one. Stop and scrape the bowl and paddle periodically.

Still on low speed, add in all of the nectarine pieces, beating just for a few seconds to combine, then add in all of the dry ingredients. Mix only until the flour looks completely incorporated. Scrape all the batter into your greased and floured cake pan. Sprinkle all of the streusel evenly over the top.

Bake the cake on the middle rack of the oven for about 55-65 minutes. You'll know it's done when the top is lightly golden, the sides are just beginning to pull away from the pan, the top of the cake doesn't jiggle at all when you move it, and a toothpick inserted in the center come out mostly dry. Check your cake after about 40 minutes and if it appears to be browning too fast, lay a piece of foil loosely over the top. Let the finished cake cool in its pan on a rack for at least 15 minutes, then run a thin knife around the sides, remove the springform carefully, and let the cake finish cooling on the rack.


(If you'd like to comment on this post, or to read any existing comments, please click on the purple COMMENTS below.)

Rustic Country Bread . . . Humble Loaves from Your Two Hands . . . Quietly

To contact us Click HERE
Do you ever have days when you want to bake, but you don't feel like making a big racket in the kitchen? You just want to do it quietly, unaccompanied by the clatter of metal pans and the growl of your mixer? Maybe the kids are still asleep and you're relishing the momentary solitude, the morning's so calm and peaceful you can't stand to break the spell. Well, I know just how you feel.


Days like that call for recipes exactly like this one. It's guaranteed not to wake the neighborhood. All you really need for it, once you've measured the ingredients, is two big bowls, a spoon and spatula, a bench scraper or sharp knife, and a good work surface for kneading. That's basically it. Oh, and you'll definitely need your own capable hands because they, my baking friends, are the most critical component. And, thankfully, they're quiet.

Now let's talk about the word "rustic" for a minute. The dictionary defines it in a variety of ways. "Characteristic of, or resembling, country people," "made of rough limbs or trees," and my own personal favorite, "lacking in social graces or polish." I think that last one applies pretty safely here without causing offense. After all, this bread is mixed by hand, shaped by hand, and it'll accept a few customizing tweaks without having a high falutin' hissy fit. It knows it's naturally good, and doesn't have to try too hard.


You can easily whip up a couple of these loaves without feeling afterward like you've just run a race or been on a bad job interview. You know how some recipes kind of make you feel like that? Where you can just tell, about halfway in, that things are not gonna turn out well? With this bread, you don't have to worry. It won't let you down. So slide your dough into the oven and prepare for happiness. Maybe even full-blown joy! At the very least, expect to experience a sense of peaceful contentment in your bread baking powers. And don't forget to enjoy the quiet while it lasts.

About this recipe . . .

Adapted from The Farm Wife blog's formula for "Country White Bread," these loaves can be made panned or unpanned, and will accept modest alterations pretty well. I added in, with the bread flour, a little bit of flax meal, along with a smidgen of wheat bran and wheat germ, to give it a little more character and substance. But I've also made it entirely with white flour, too, and that's a great loaf also.

I love bread that doesn't need to bake in a pan, don't you? I baked these on a stone, but you can certainly bake them atop parchment on a baking sheet.


Rustic Country Bread

(For a printable version of this recipe, click here!)

Yield: Two standard size round loaves

1 and 1/2 cups very warm water (about 120 degrees or so)
1/2 cup milk (I used 2 percent.)
2 tablespoons granulated sugar
2 teaspoons salt (I used coarse kosher salt.)
3 and 1/4 teaspoons instant yeast (I almost always use this kind of instant yeast, which requires no proofing; if you want to use active dry yeast instead you'll need two standard size packets, and you'll want to proof them first in a bit of the warm water before adding that into the bowl.)
6 cups bread flour, and possibly a little more for flouring your work surface
1 and 1/2 tablespoons flax meal
1 tablespoon wheat bran
1 and 1/2 teaspoons wheat germ
2 tablespoons of unsalted butter, softened to room temperature
2 large eggs, lightly beaten

In a large bowl, lightly whisk together the sugar, salt, instant yeast, three cups of the bread flour (only three), the flax meal, wheat bran, and wheat germ. Add the water and milk into this, stirring until very well blended.


Add in the butter and eggs, and stir until fully combined. 


Now, gradually add in about two and one half cups more flour, stirring until the dough looks like a rough shaggy mass that pulls away from the sides of the bowl. 


Scrape the bowl and dump the dough out onto a well floured work surface. (Also flour your hands well, and keep a handful of extra flour nearby for this purpose.) 


Knead the dough until it feels smooth and elastic, working in the final 1/2 cup of flour as you do so; this may take at least five minutes of steady kneading, more or less. 


Use oil, vegetable spray, or shortening to completely coat the inside of another large bowl. Put your dough into it, turning it over once so it's coated all over. Grease/spray etc. one side of a sheet of plastic wrap and use it to cover the bowl, greased side down. Place the bowl in a warm spot and let the dough rise until it has doubled; that should happen within an hour (mine took barely 40 minutes on a hot day). 


Press your fist into the risen dough, here and there, a couple of times to deflate it. Turn the deflated dough over in the bowl and cover it again with the greased plastic wrap. 

Again, let it rise until doubled. And, again, this may take up to an hour depending on how warm your house is. When the dough has doubled, dump it out onto your work surface (only very lightly floured this time) and cut it into two equal parts using your bench scraper or a sharp chef's knife.


Shape each of the two halves into a shallow round, making sure to tightly pinch closed any seams. Sprinkle a very thin layer of cornmeal (or you can use a little flour) onto a couple of parchment sheets. Set the dough rounds on the cornmeal. Cover the dough with greased plastic wrap and let them proof (aka have their final rise) until about doubled. This might take half an hour.   


If you're going to bake the bread on metal baking sheets, preheat the oven to 400 degrees for at least 20 minutes. 

If you're using a ceramic baking stone, preheat the oven to 475 for at least half an hour so the stone can get really hot, then turn the oven down to 400 immediately upon placing the dough into the oven.

If you are using metal sheets, you can just slide the dough, still on its paper, right onto them when you're ready to bake. If you're going to bake on a preheated baking stone, you can still give the dough its final proof on cornmeal over parchment, but then gently move the proofed loaves onto a cornmeal-dusted baker's peel to transfer them to the hot stone (that's what I did).

Before putting the dough into the oven, use a little misting bottle of water (or, if no misting bottle, you can do this by wetting your hands and then gently patting the loaves) to moisten the top of the loaves. This will help prevent the loaves from bursting open as they bake. Also, it's a very good idea to squirt misty water quickly into the oven upon placing the dough in there, creating a nice steamy atmosphere (just don't aim right for the oven light).

Bake the loaves for about 20 to 25 minutes or so, until they're quite golden brown on the top and bottom. (The internal temperature of the loaves should be at least 190 when they're done; if you want to, you can stick a stem thermometer in the bottom of each loaf if you like. Under-baked bread will be noticeably dense/gummy inside, and just feel heavier when you handle it right out of the oven.)

Let the loaves cool on a rack for at least half an hour before slicing. Great for sandwiches, toast, french toast, you name it. Freezes well.


(If you'd like to comment on this post, or to read any existing comments, please click on the purple COMMENTS below.)

Big-Top Nectarine Muffins . . . with Salted Marcona Almonds and Turbinado Sugar: Get Under the Big Top!

To contact us Click HERE

Over 25 years ago I landed my first real job at a publishing company in downtown Detroit. It was an interesting place, filled with smart, witty, and sometimes eccentric people, most of whom were recently graduated English majors like me. As entry-level research/editorial workers we had much in common--an insatiable love for reading, a constant yen to discuss books and authors, and the fact that we were all pathetically underpaid.


Despite our paltry wages, we did have unique company benefits. For example, employees could get free copies of any book they worked on and, typically, each person had a hand in several books each year, so that was potentially a lot of books. Since our names appeared on the credits page of each such book, that was a nice perk. In those early days, it was a thrill to open up a spanking new volume and show parents or friends your name in print. Another benefit was a policy requiring us to take rigidly scheduled breaks twice a day. Mandatory breaks. Just like recess in elementary school, once in the morning and once in the afternoon. A cute idea, at least in theory. You weren't supposed to work through a break, even if you were smack in the middle of a meeting or an involved task. That was the rule.


The break allowed enough time for a cup of coffee and chit-chat, but not much else. That, however, rarely deterred the famished among us from trekking out of our historic high-rise and heading down West Fort Street in search of nourishment. We'd dash half a block and duck into Britt's Cafe, a cafeteria/bakery that was bizarrely sequestered in the back of a high-end office supply store. (I know I reminisced here about Britt's once before, but please indulge me as I simply must do it again.) A best-kept-secret kind of place, Britt's produced fabulous baked goods, along with fantastic sandwiches, soups, and salads. Their roughly-constructed scones were to die for, and their fresh muffins sported the most colossal tops I'd ever seen. Once pulled from the oven, the muffins were cut apart and hoisted out of the pans. They were hearty, deeply golden, and packed with chunks of ripe fruit, toasted nuts, tangy dried berries. Sprinkled with coarse sugar, each was a glittering spectacle, a muffin-meal in and of itself. Well worth the risk of making it back to work a few minutes late.


I was reminded of Britt's muffins as I made these yesterday morning. My batter was really thick, there was a lot of it, and I wondered for a moment if I'd need two 12-cup pans versus just one. As I greased the cups with a pastry brush, I decided it would be fun to engineer a similar  top-heavy result. I loaded the cups with batter, rounding them above capacity with my ice cream scoop, dusted the tops with nuts and sugar, then slid them into the oven.

These big-tops are in honor of Britt's, a great Detroit food spot that no longer exists but, happily, still persists in memory.


About this recipe . . . 

This is an original, unadapted recipe. It contains a small amount of whole wheat pastry flour, which you can leave out if you wish (use white or regular whole wheat instead), along with small pieces of sliced, peeled nectarines (feel free to use peaches, or apples, instead). Coarsely chopped, salted, unblanched, Marcona almonds (oh, they're so, so good--I buy them from Trader Joe's) and turbinado sugar crystals are sprinkled on top. This recipe produces a hearty muffin that's not what I'd call cakey, nor too sweet.


Hearty Big-Top Nectarine Muffins with Marcona Almonds

(For a printable version of this recipe, click here!)

Yield: 12 very generous standard size muffins

1 and 1/3 cups light brown sugar, firmly packed
1/2 cup plain non-fat yogurt (stir in a tablespoon or so of milk if it's thick yogurt)
1 teaspoon lemon juice
1/2 cup and 2 tablespoons canola oil
4 large eggs, lightly beaten
1 XL (or 2 medium size) ripe nectarine, peeled, and cut into very small chunks (you'll need about one generous cup of chunks)
3 and 1/2 cups unbleached all-purpose flour
1/2 cup whole wheat pastry flour (if you omit this, add in the same amount of another flour)
2 teaspoons baking soda
1 teaspoon of sea salt or coarse kosher salt
2 pinches of ground cinnamon
A few scrapings of fresh nutmeg, or about 1/4 tsp. ground nutmeg

For the top of the muffins:
1/2 cup salted, unblanched, Marcona almonds, coarsely chopped
1/4 cup turbinado sugar (if you don't have this, you can instead use Demerara sugar, sanding/coarse sugar, or regular granulated sugar)

Heat your oven to 350 degrees. Liberally grease a 12-cup standard size non-stick muffin pan, and also grease the top of the pan (I even use baking spray on top of all this, whenever I'm not using paper liners); or use paper liners and grease just the top of the pan.

In a large bowl, whisk together the flours, baking soda, salt, and spices.

In another large bowl, stir together the brown sugar, yogurt, lemon juice, oil, and eggs. Stir until well combined, then add in the nectarine chunks.

Make a well in the center of the bowl of dry ingredients, pour in all of the wet ingredients, and stir just until combined. It's okay if a few small streaks of flour are visible. Using a portion scoop, distribute the batter equally into the muffin cups, heaping them high. Sprinkle the tops first with chopped almonds, and then with turbinado sugar.

Bake for about 20 minutes or more, until a toothpick inserted in the center comes out mostly clean, the muffins are golden brown, and a finger pressed gently on the top of a muffin springs back. Check the muffins after about 15 minutes and if they're browning too quickly, lightly cover them with a sheet of foil. Let the muffins cool for about five minutes in the pan on a rack, then cut them apart to remove them from the pan and let them cool further on the rack.


(If you'd like to comment on this post, or to read any existing comments, please click on the purple COMMENTS below!)

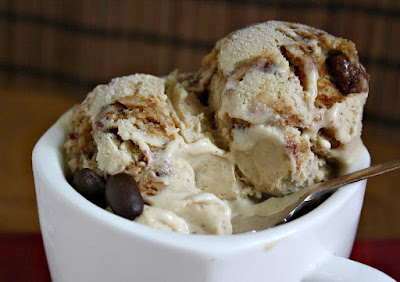
Choffee Chip Chunk Ice Cream . . . (Coffee Ice Cream with Chunks of Milk Chocolate Chip Cookies)

To contact us Click HERE


Let's have a show of hands. Of all you folks out there, who among you likes ice cream, likes coffee, and also likes chocolate chip cookies? Please keep 'em up while I count . . . . . . . . . . . . . . . um . . . . . . . . . . okay . . . still counting . . . . . . still counting . . . whew . . . lots of hands . . .

Just as I thought. You can put your hands down. I'm gonna go ahead and round the total up to about a zillion people or we'll be here all day. Clearly, the vast majority of us are of the same mind on this issue. After all, what's not to like?


About this recipe . . .

If you are a fan of that flavor trio, you'll love this. Adapted from the formula for Black Coffee Ice Cream in Jeni's Splendid Ice Creams at Home, a compact book by Jeni Britton Bauer (that I first mentioned to you in this post, on vanilla mascarpone ice cream with roasted cherries, several weeks ago), this is another recipe that's too good to ignore. Expect an absolute premium result, and prepare to experience superb creaminess.


As for the cookie chunks, I recommend using this fail-safe chocolate chip cookie recipe, using all milk chocolate chips/chunks instead of an assortment of chocolate. I suggest baking the cookies slightly longer than normal, so they'll be crispier and will easily break into small pieces. You'll need about eight, thin 3" cookies to add into the ice cream. This is an excellent chocolate chip cookie recipe for any purpose, and one that I've made dozens of times over the years. (My kids are crazy-cuckoo-nuts for these cookies.)


So, love coffee? Love ice cream? Love chocolate chip cookies? Yes? Then it's settled. You've got to try this. That's all there is to it.


Choffee Chip Chunk Ice Cream (Coffee Ice Cream 
with Milk Chocolate Chip Cookie Chunks)

(For a printable copy of this recipe, click here!)

Yield: Slightly less than one quart

2 and 1/2 cups whole milk (I didn't have whole milk, so I used 2 cups 2 percent milk, and 1/2 cup half & half instead.)
1 tablespoon and 2 teaspoons cornstarch
3 tablespoons (1.5 ounces) cream cheese, softened (I used Philadelphia brand.)
1/8 teaspoon fine sea salt
1 and 1/2 cups heavy cream
3/4 cup granulated sugar
3 tablespoons light corn syrup
1/4 cup of coffee beans, ground coarsely (I used French roast beans.)
About 8 thin and crispy milk-chocolate chip cookies, approximately 3" in diameter,
       broken into small pieces and frozen

In a very small bowl, stir together two tablespoons of milk with all of the cornstarch until smooth (this is the "slurry").

In a medium bowl, stir together the cream cheese and the salt. Set aside.

Fit a piece of cheesecloth into a strainer and place that atop a medium size bowl (this will be used to strain the coffee-bean particles out of the still-in-process hot liquid). Set aside.


Fill a large bowl about halfway with ice cubes and cold water. Set aside. Place a large, clean Ziploc bag, opened and ready, near the bowl (you'll pour the finished hot liquid into it, then place the closed bag into the ice water to cool).

In a large saucepan, combine the rest of the milk, the heavy cream, sugar, and corn syrup. Over medium high heat bring the mixture to a steady low boil. Boil for four minutes. Take the pan off the burner and pour in the ground coffee beans. Let it steep for five minutes. Pour the liquid through the cheesecloth-lined strainer into the medium bowl. Squeeze as much liquid as you can out of the beans, wrapped in the cheesecloth, then discard the beans and cloth.

Pour the liquid back into the saucepan and whisk the cornstarch in slowly. Return the liquid to a boil over medium high heat and cook just until it's slightly thickened, stirring constantly and scraping the bottom and sides with a heat-proof spatula. Take the pan off the heat.

Slowly pour the hot liquid into the bowl with the cream cheese and salt, whisking as you do so until it looks quite smooth.


Pour all of this into the Ziploc bag, zip it closed tightly, and place that into the bowl of ice water for about half an hour or until decidedly cold, adding more ice to the bowl as needed.

Remove your frozen cookie pieces from the freezer. Have the container into which you will put your churned ice cream close at hand. Following the manufacturer's directions for your own ice cream freezer, churn the ice cream until it thickens. (I use the ice cream attachment for my KitchenAid mixer and usually need to churn ice cream for about 20 minutes or longer.)


Quickly layer the churned ice cream into its container along with the broken cookie pieces; don't stir the cookies in, just sprinkle them over the ice cream more or less evenly, remembering to sprinkle some atop the last layer.


Seal your container well, and freeze your ice cream until very firm (I let it freeze for about 16 hours before trying it, but you don't have to wait that long!). Enjoy!


(If you'd like to comment on this post, or to read any existing comments, please click on the purple COMMENTS below.)

Pumpkin Scones with Do-it-Yourself Cinnamon Chips

To contact us Click HERE

Ahh, yes, cinnamon chips. They were one of those newish ingredients I was loathe to try when they first appeared in the grocery store a couple of years ago, because they just sounded too fake to me. I envisioned little waxy textured, synthetically-flavored dots of hardened goo. It wasn't hard to tamp down what was a very moderate curiosity to begin with. I passed them by in the market week after week. No backward glance. Something--I knew not what--would have to legitimize cinnamon chips before I would trade cold hard cash to procure them.


And then, about a year and a half ago, I discovered King Arthur Flour's mini-cinnamon chips--better in quality than what I'd seen at the grocery store, no doubt. I bought a small bag, tested them out in a recipe, and found they were actually pretty darn good. So good, in fact, that I was miffed to realize I was completely out of them when I began assembling my ingredients to make these pumpkin scones the other day.  Not a single King Arthur cinnamon chip to be found on the premises. My choices? Use something besides cinnamon chips in the scones (mini chocolate chips? chopped candied ginger? chopped pecans or walnuts? raisins?); leave them plain (still good, but boring); or take a stab at making my own quick-and-easy chips at home. I picked the Do-It-Yourself option.


I had a sizable chunk of Callebaut white chocolate on hand, so I cut off a modest wedge, melted it slowly and carefully in the microwave, mixed in a scant teaspoon of ground cinnamon, spread the mixture thinly onto a piece of plastic wrap, sprinkled more cinnamon over that, laid another piece of plastic wrap over that, and slid it into the freezer for less than five minutes. Once rigid as a board, I broke the cinnamon-chips-to-be into a zillion tiny pieces, added them into my scone batter, and voila! Homemade cinnamon chips in homemade pumpkin scones. Sensational.

What, I ask you, is autumn without a nice warm batch of pumpkin scones cooling on the kitchen table? I dare not think.


About this recipe . . . 

Adapted from a King Arthur recipe aptly titled Harvest Pumpkin Scones, I made only a couple of small changes to the formula. I used a little more pumpkin than called for, along with a smidgen of 1/2 and 1/2; my dough, otherwise, would have been extremely dry. I also reduced the amount of allspice by half. I used homemade cinnamon chips, and I reworded the recipe to reflect my actual steps.

Pumpkin Scones with Do-it-Yourself Cinnamon Chips

(For a printable version of this recipe, click here!)

Yield: 8 large scones.

No mixer needed for this recipe (yay!).

Ingredients for the homemade cinnamon chips:

3 oz. of good quality white chocolate, or white chocolate chips
1 teaspoon ground cinnamon
and
1/2 teaspoon ground cinnamon

Ingredients for the scone dough:

2 and 3/4 cups unbleached all-purpose flour
1/3 cup granulated sugar
1 tablespoon baking powder
3/4 teaspoon fine sea salt
3/4 teaspoon ground cinnamon
1/4 teaspoon ground ginger
1/4 teaspoon ground nutmeg (I use fresh grated, and buy the whole nutmeg at a Penzey's spice store.)
1/8 teaspoon allspice
1/2 cup (1 stick) cold butter, cut into 1/2 inch chunks
3/4 cup canned pumpkin
1 tablespoon 1/2 &1/2 (or use milk)
2 eggs, large

A few tablespoons coarse white sugar (aka sanding sugar) to sprinkle on the scones before baking
2 tablespoons of 1/2 &1/2 or milk

To make the cinnamon chips:

Melt the white chocolate slowly and carefully in your microwave, or melt it in a small bowl set over a pan of simmering water on the stove. If you do it on the stove, be sure no water at all gets into the bowl with the white chocolate. Stir the 1 teaspoon of cinnamon into the melted white chocolate thoroughly. Spread out a small sheet of plastic wrap on a flat surface. While the chocolate is still very warm, spread it out thinly on the plastic wrap using a spatula or bowl scraper. Sprinkle the 1/2 teaspoon of cinnamon over that. Cover it with another sheet of plastic wrap. Put it in the freezer for five minutes. Take it out when it's stiff as a board. Break it up into mini-chip-size pieces.

To make the scone dough:

Whisk together, in a large mixing bowl, the flour, granulated sugar, baking powder, salt, cinnamon, ginger, nutmeg, and allspice.

Using a pastry blender, a fork, or even your fingers, work the butter into the dry ingredients until crumbly. It's fine if some small lumps remain. Toss all of the homemade cinnamon chips in and stir to combine.

In another bowl, whisk together the eggs and canned pumpkin. Pour all of this into the bowl of dry ingredients and stir until it comes together into a solid dough.

Turn the dough out onto a lightly floured surface, and pat it into a ball.

Press the dough with your hands into a large circle, at least 10 inches in diameter and 3/4" thick. Using a sharp knife or a pastry wheel, cut the circle, pie-style, into 8 even triangles. Lay the triangles on a parchment covered baking sheet. I bake my scones so they're not sitting right next to each other, and they have a chance get golden brown all over; you may also choose to bake them about 1/2" apart from each other so they'll end up slightly attached and less crispy on the sides. Brush the tops of each one with half and half, and sprinkle generously with coarse/sanding sugar or regular granulated sugar (coarse sugar will be more sparkly, once baked).

Preheat your oven to 400 degrees. Now put the scones, still on the baking sheet, into the freezer for about 20 minutes. (This step is a recommendation from KAF, and I think it really does seem to add to the scones' oven spring. They puff up nicely.)

Bake the scones for at least 20 minutes. They are done when they're golden brown, and a toothpick inserted in the thickest part comes out completely clean. Serve them warm or cold. Best the first day, but still pretty good the second!


(If you'd like to comment on this post, or to read any existing comments, please click the purple COMMENTS below.)

29 Eylül 2012 Cumartesi

Guest Post: Napa Cabbage Salad with Oranges, Spicy Shrimp, and Rice Wine Vinaigrette

To contact us Click HERE

salad 5

Hi guys!

Remember when I showed you my entry for the Kimchi Chronicles video contest a while back? Although I did not win, I ended up with a really wonderful surprise. After they featured my blog post on Gimbap several weeks ago, I was invited to create some original Korean fusion recipes for the Kimchi Chronicles blog!

For my first recipe, we have a delicious Napa Cabbage Salad with Oranges, Spicy Shrimp, and Rice Wine Vinaigrette. By repurposing napa cabbage, which is traditionally used to make kimchi, as well as incorporating some of Korea’s signature savory and spicy flavors like ginger, garlic, and gochugaru (red pepper flakes), I came up with a light, refreshing recipe of which I’m really proud.

I know that sentence sounds awkward, but I couldn’t bring my inner English nerd to end it in a preposition.

oranges

As I’m sure you can tell by my gushing, I really am proud of this recipe. In short, I’m thrilled to have this delightful new gig over at Kimchi Chronicles and I hope you’ll pay them a visit to check out my recipe, as well as tons of other yumminess on their blog.

Spring Break Adventures, Part 1

To contact us Click HERE

window

As you know, I am currently a college student.

As you know, college students have spring breaks.

As you know, college spring breaks are usually full of wild parties and scandalous behavior.

As you know, this geeky food blogger's spring break was not.

Yep, rather than cruise down to the beach with a group of wild and crazy gal pals, I stuck nearby. Due to the unfortunate nature of college costing an arm and a leg, there hasn't been any extra cash around for major vacations as of late. But if you think that it cost me the fun of spring break, you would be quite mistaken. It wasn’t all Snuggies and Netflix for this girl. Even without huge vacation plans, my family and I ended up doing some rather fun activities.

The way we decided our budget-friendly plans was this--while we can't go on an international, jet-set vacation in the here and now, we can come up with some entertaining substitutions. Taking advantage of Houston's amazing cornucopia of cultures, we decided to do a mini tour, starting with Sweden.

By way of Ikea.

Don't roll your eyes at me you lucky international travelers! I am well aware that a huge warehouse of gorgeous, reasonably-priced furniture and yummy little meatballs can in no way replace the experience of actually being in the Sweden. Rather, I like to think of it as a taste of the bigger picture. And let me tell you, that future tastes pretty darn good.

I will make no claims that my desire to visit Ikea did not revolve almost solely around food. Something about those plates of Swedish meatballs topped with brown gravy with a gentle spoonful of lingonberry preserves on the side called to me like a pack of manatees to 18th century, scurvy-addled sailors.

meatballs

And gosh were those meatballs yummy. I think they single-handedly renewed my love of sweet-and-savory combinations. Just the meatballs alone would've been pretty good, but paired with the sweet and slightly bitter taste of lingonberry preserves they were amazing. Totally took care of all the hunger pangs that I accumulated from excitedly scurrying from one living room setup to another and practically hugging half a dozen mod TV consoles and granite kitchen counters.

Along with my meal, I also got to grab a little something from a tiny salad bar nearby, which, having almost run out of lettuce, I took as an opportunity to fill my bowl mostly with with kidney beans, chickpeas, and sweet pickles. Thanks to what I can only dub an Ikea high, I actually enjoyed the sweet pickles, an item that I usually avoid like the plague.

Hamburger dills all the way for me.

salad

Oh, and this pie. I cannot—absolutely cannot—neglect to mention this pie/cake/pile of yum. I believe it’s more accurately called an almond cake with chocolate and butterscotch, but that’s beside the point. What entirely is the point is the crunchy almond cake, topped with some sort of whipped-cream-with-maybe-a-touch-of-butterscotchy-custard thing, topped with a layer of crunchy things and chocolate. I know that my description does not do it justice, but trust me on this—major, major deliciousness.

pie

On our way out of the store, we stopped by the Swedish foods section and did a bit of shopping there as well. Beyond the frozen and prepackaged versions of much of what is sold in the cafeteria upstairs, there were also surprising, mysterious gems such as these…

fishy spreads

Crab and fish spreads.

I had no idea what to make of these. It’s not like things such as smoked salmon or crab dip is all that unfamiliar, but something about fishy spreads packaged in squeeze tubes left me equal parts confused and delighted.

crab spread

While I passed on the crab spread and its other seafood chums, we did bring home a few party favors.

My mom and sister shared some blueberry preserves…

blueberry preserves

… as well as some lemon ginger cookies.

ginger cookies

Horseradish sauce (this was a dad pick).

horsradish spread

And lingonberry preserves for me.

lingonberry preserves

We also bought several bars of dark and milk chocolate, but they’ve kinda disappeared.

In my tummy.

I have to say, after geeking out with you guys over my newfound love of Ikea, I really enjoyed my trip there. Even if it was just a visit to a furniture store in my same old city, it was a lot of fun. Come to think of it, though, there is something I’m curious about. After spring break, every time I told someone that I went to Ikea for the first time, they stared at me, wide-eyed and mouth agape, unable to believe that I had never been there before. How far behind the bandwagon was I on this? Have any of you been to Ikea? Any favorites or recommendations for my next trip??

Oh, and stayed tuned! I went somewhere else new over spring break—a place that involved lots of eating and irresponsible food shopping. Part 2 coming soon!